Friday, March 27, 2009

怨念神书

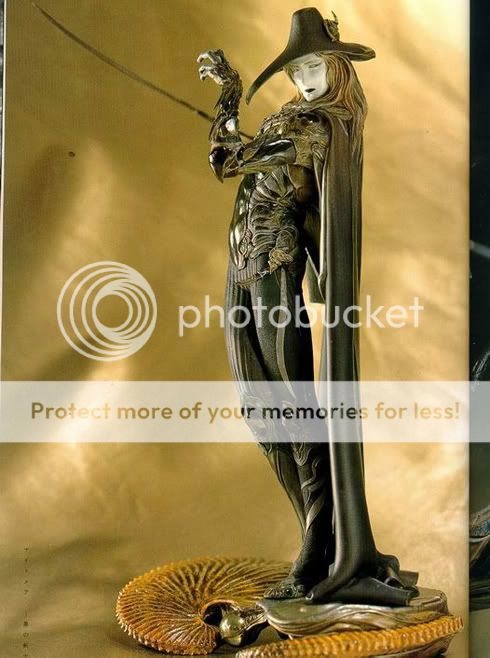
A couple of days ago, i was surfing ebay as usual and was randomly typing some name when i came across this auction.
《Angles of Hunters - Takayuki Takeya Artworks》
《漁師の角度-竹谷隆之作品集》
The price of this book i would rather not talk about, it was a book that was published ard 10 years ago and is out of print now. Its published by S.M.H and is more well known now as Hobby Japan. Basically this book contains most of Takayuki Takeya's sculpture to date at that time. The book is considered a legend and sought after by alot of fans. I came to know about this book's existence while i was doing my FLUX Magazine school project when i was researching on him.

One would wonder who is this guy, well, for a start, he's the sculptor of most of the S.I.C series of toys and some of the Final Fantasy Playarts series. He is also involve in the character design of some final fantasy series. Famous for his version of Organic Mecha and dark sculpting technique, he is a master sculptor in his field. With brother's help, i managed to get hold of this book at a pretty costly but worthy price. Well, i'm a happy man~~ :)

It seems that recently i keep having things with Singapore Post office, that day was the collection of this book, and then the collection of the redemption letter, and today the singnet router and my brother's driving license...LOL... well, i decided to invest in a Lenovo S10, now i only hope to collect it asap. Exhibition is around the corner and i'm still slacking around...zz...while consulting Tito for advice on wallpaper that day, Joselyn called me over and told me about the IFS intern application result...sigh, i have to build up a portfolio on deviantart... guess i really have to work harder now...still not enough...

That day movie craze came over me and i went to rent Sekai no chuushin de ai wo sakebu (shouting out love at the center of the world) and Tetsujin 28. Well, shouting out love was a really good movie and they had a korean version of it, but i tot it was jus fairly ok compared to the original. Recently i have been on a movie rampage, but den again when was i not...Confession of a shopaholic was fairly ok and entertaining. I won't say its very good, or very bad....jus average. Well gotta sigh off now, and decide on wat to do next...zzz

sometimes...i jus spend so much time on thinking of wat to do...tt i end up doin nothin...lol

Some images i found over the net showing the content of this book. I dun wanna scan it to spoil the spine of the book, its 10 years old after all.... :)


Current Fayleng: Super touched that i got this book....

Thursday, March 12, 2009

D.M.C...Departure...Bloody Rose customisation...(massive images)

Finally watched Detroit Metal City, L donning the cockster hairstyle is super funny... the movie was pretty entertaining with Kenichi Matsuyama showing off his superb acting skills. Well, he fully portrayed the character of Soichi...LOL...

2 weeks ago was bad...Missing Tito's class...sigh... my decision to go on a double side is...i guess...over toiling me...36 pages....18 pages per side...keh kiang...relly keh kiang...guess i shud work hard to finish it, so as not to disappoint him~~ sigh.... but well, last week i finally showed him the first completed half and i guess he was happy enough that even though we took so long, we produced a fairly acceptable work.

Watched Departure the other day, and it was very good...i would rate it a 6 out of 5 stars! But well, that would have to depend on whether one would appreciate this kind of show.... The main actor was really funny and Ryoko Hirosue is really adorable and pretty....woot.. The entire movie had its share of humour and touching scenes. Its a must catch i guess, GV rating it 4 half popcorn.

I've finally decided to post the images for my bloody rose customisation...below is the process of me customising it at different stages...the end result wasn't really....pretty...but for photographic purpose and photoshop manipulation...i guess its enuff...the wrong choices of material really made me regret as i was approaching the end of the customisation. Guess i shud have used plastic corrugated board instead....sigh....beta try next time... if~ i have the mood...was really glad the receiver din mind the bad craftmanship...

1:1 Colt 1911 Amt Hardballer Customization - Bloody Rose
When i decided to make this weapon, i din wan to create a weapon that look like toy in terms of shape and appearance. Most of the customisation i saw online were too squarish in form not resembling the original weapon at all. So i decided to use corrugated board due to the inner spine that can allow me to bend the cardboard and creating a more solid curve.

Layer of slightly different sized corrugated cardboard were cutted and stick together with double sided tape, i'm not really a fan of glue...too messy and i hv to wait for it to dry. The accuracy of the barrel has to be fairly taken note of so that the wrapping in the various parts would fit nicely. The staggered sides on top of the barrel and handle is meant to create a rounded profile when wrapped over.

Here you can see how the cardboard are stuck together, with and additional board strip below. From here you can see various holes made by the corrugated board's end, we'll be using epoxy putty or art card to seal them later.

The first under wrap. As you can see, the cardboard is now bended and due to the staggered portion of the barrel, it creates a perfect rounded profile underneath. Accuracy for the underwrap has to be taken note as well, cos it would have to fit with the other wraps later.

Zoom out view.

Wrap applied, now you can see the rounded profile beneath the barrel more clearly.

Top over wrap using the same method as before, creating the upper slide of the weapon.

As you can see now, we now have a very rounded and nice looking barrel. Its rather different from other cardboard customisation in a sense that the shape is more dynamic rather than squarish, losing the sophisticated and elegant appearance of the weapon.

The trigger guard portion of the weapon after the 2nd wrap.

Our third underwrap. You can see the additional profile beneath the long slide, stretching to the trigger portion. At this stage, you can see that the weapon's barrel is almost completed in terms of form. Here you can see the slot created by the wrap meant to fit the trigger later.

Handle wrap incorporating the curve profile of the trigger portion.


The thickness of the weapon is increasing now, fulfilling the actual thickness of the weapon. Of course the first basic layer has already taken the overall thickness into consideration.

The weapon as an overall without the trigger. Here you can see the slot made by the handle wrap meant to accomodate the trigger in the later part.

This portion proves to be a pain in the ass to do. I had to stack various cardboard together to cut the trigger out. Here the profile of the trigger is changed to fit the appearance of the comic version of this weapon. First and last layer were cutted with onli the shape of the trigger guard,the 2nd and 3rd with the trigger and trigger guard. The trigger is den slotted in to the premade allowance on the weapon. The various wrap was being made to accomodate the slot. Point here is to cut bigger and den amend later rather den cut too small and den redo.

The completed cardboard version of the weapon with the barrel muzzel sealed with a normal art card.

This portion, proves to rather expensive. Cos from here on, i had to use epoxy putty to seal the gaps and holes made by the nature of the corrugated cardboard. I also had to strengthen the flimsy trigger portion. At this image, the base of the handle is sealed with a artcard as well, the various gimmick above the handle, the firing pin on top are all made with artcard and then stick on with double sided tape.

Here you can see, the handle being sealed with epoxy putty and the firing pin as well.

Zoom out view, idea here is to create the detail profile of this part of the weapon.

the smooth curve profile beneath the long slide was created by smoothing out the putty.

After all the putty has dry and hardened, i sand them smooth and sprayed the weapon with silver paint. The words you see is created by tattoo paper and den printed on.

The weapon is considered done here, but due to the nature of the cardboard, there seems to be fur on the surface due to contact with the wet paint, the texture does not resemble the weapon as well, too rough and uneven. The trigger and handle is also in a very bad shape as i din sand them off enough.

Test shot of the weapon when its being carried by a person, i thought it proved enough for a cosplayer as the details wud be lost judging from the distance a photo would normally be taken, from here, you can't really see the flaw and the uneven surface of the barrel.

The other side of the weapon, proves to be an ugly side. LOL.

I decided to retouch up the weapon abit, with my brother's help, he resand the entire weapon. The firing pin, the trigger the top of the slide of the weapon and the ring for the chain below the handle.


You can see how crazily flat this portion is, yep, thanks to my brother's help. This portion of the trigger was perfected.


The firing pin portion, after being sanded by my brother. He destroyed the gimimcks above the handle though, but it was still alrite as i can fix them with putty later.


The barrel slide, sanded to a more even surface.

I den added a layer of transparency over the top slide and den respray it.

The other side of the weapon, here you can see that the long slide now looks more like metal now, having a more even and smooth matte surface.

Some touchup of the chain and the muzzle.

Here you can see hints of the tattoo paper of the words, and you can also get a close up of the slide's smoother finish.


Final completed weapon.

The original weapon and image that was referenced for this weapon. Although i wasn't really happy with the final weapon, but i'm glad i touched up the weapon again. The entire customisation took me 3 days to complete, costing approximately 50 plus bucks, sponsored by Med. I had the help of my brother with the sanding of the surfaces.


Current Fayleng: Rather shag after typing such a long tutorial....zzz, guess its back to my novel again...zzz